Intune - dealing with ErrorCode 0x8018002b
Intro
Happy New Year!🥳 Starting 2020 I promised myself to increase frequency of the posts so fingers crossed that it works out😉
In this post you will find couple of steps that are worth to try if your device is having problems enrolling to Intune. I can’t guaranty that it will help with every device. That’s why you should think of this post as check list of things to keep in mind while debugging workstation.
My environment configuration:
- Hybrid Azure AD Join
- Auto-enrollment to Intune with GPO
Things that will come in handy during troubleshooting:
- dsregcmd /status - cmdlet which shows is device is AAD joined. More details
- Event Viewer - Application and Services Logs:
- Microsoft/Windows/AAD
- Microsoft/Windows/DeviceManagement-Enterprise-Diagnostics-Provider
- Microsoft/Windows/User Device Registration
- Systeminfo
BIOS update
Check if your device has up-to date BIOS version. Sometimes simple plain update will get things moving. If you are using Dell laptops it is best to use Dell Command | Update tool. Version 3.1.0 brought a lot of nice improvements and features! I like using it from Powershell terminal and it is very simple:
#Go to location of installation
cd 'C:\Program Files (x86)\Dell\CommandUpdate'
#Firstly you need to set bios password if you have one
.\dcu-cli.exe /configure -biospassword="YourBiosPass"
#Response should be
'-biospassword' setting updated with value 'YourBiosPass'.
Execution completed.
Program exited with return code: 0
#Updating BIOS
.\dcu-cli.exe /applyupdates -autoSuspendBitLocker
#Tool will scan device for any drivers that need update. For BIOS update laptop needs to connected to power source and -autoSuspendBitLocker is needed too.
after reboot update will be applied.
Boot mode
Some devices might have been configured so long time age that its partition style is MBR and it still runs in Legacy mode with Secure boot Off. It can be changed without reinstalling OS! Conversion to GPT feels like a huge risk so if you have a way to backup whole disk I recommend that. But I’ve done it on two different laptops in: FullOS Mode and in Windows 10 Safe Mode with Command-prompt and it worked both times! More details about the tool here. Keep in mind that changes cannot be undone and device will only boot in UEFI mode. So if you are doing it remotely you will need Dell Command | PowerShell Provider to make changes in BIOS from Windows.
#It is good to run validate parameter first
c:\Windows\System32>.\mbr2gpt /validate
MBR2GPT: Attempting to validate disk 0
MBR2GPT: Retrieving layout of disk
MBR2GPT: Validating layout, disk sector size is: 512
MBR2GPT: Validation completed successfully
#If you are doing this from Widnows use /allowFullOS
c:\Windows\System32>.\mbr2gpt /convert /allowFullOS

MBR2GPT will now attempt to convert disk 0.
If conversion is successful the disk can only be booted in GPT mode.
These changes cannot be undone!

MBR2GPT: Attempting to convert disk 0
MBR2GPT: Retrieving layout of disk
MBR2GPT: Validating layout, disk sector size is: 512 bytes
MBR2GPT: Trying to shrink the system partition
MBR2GPT: Trying to shrink the OS partition
MBR2GPT: Creating the EFI system partition
MBR2GPT: Installing the new boot files
MBR2GPT: Performing the layout conversion
MBR2GPT: Migrating default boot entry
MBR2GPT: Adding recovery boot entry
MBR2GPT: Fixing drive letter mapping
MBR2GPT: Conversion completed successfully
MBR2GPT: Before the new system can boot properly you need to switch the firmware to boot to UEFI mode!
Now with the help of another awesome Dell tool I will be changing boot mode
Install-Module -Name DellBIOSProvider
#Check what options are available and how does BIOS objects look like
Get-Item DellSmbios:\BootSequence\BootList | select *

PSPath                    : DellBIOSProvider\DellSmbiosProv::DellSmbios:\BootSequence\BootList
PSParentPath              : DellBIOSProvider\DellSmbiosProv::DellSmbios:\BootSequence
PSChildName               : BootList
PSDrive                   : DellSmbios
PSProvider                : DellBIOSProvider\DellSmbiosProv
PSIsContainer             : False
Attribute                 : BootList
CurrentValue              : UEFI BOOT
ShortDescription          : Boot List Option
PossibleValues            : {Legacy, Uefi}
UnsupportedPossibleValues : {}
Description               : Boot List option determines the boot mode of the system. Uefi - Enables booting to Unified
                            Extensible Firmware Interface (UEFI) capable operating systems. Legacy (the default) - Ensu
                            res compatibility with OSes that do not support UEFI. NOTE: Legacy boot mode is not allowed
                             when secure boot is enabled or Legacy Option ROM is disabled.
#Setting boot mode to UEFI
Set-Item DellSmbios:\BootSequence\BootList -Value Uefi
#Checking setting of Secureboot
Get-Item DellSmbios:\SecureBoot\SecureBoot | select *

PSPath                    : DellBIOSProvider\DellSmbiosProv::DellSmbios:\SecureBoot\SecureBoot
PSParentPath              : DellBIOSProvider\DellSmbiosProv::DellSmbios:\SecureBoot
PSChildName               : SecureBoot
PSDrive                   : DellSmbios
PSProvider                : DellBIOSProvider\DellSmbiosProv
PSIsContainer             : False
Attribute                 : SecureBoot
CurrentValue              : Enabled
ShortDescription          : Secure Boot Enable
PossibleValues            : {Enabled, Disabled}
UnsupportedPossibleValues : {}
Description               : Enables or disables the secure boot feature. For secure boot to be enabled, the system need
                            s to be in UEFI boot mode and the Enable Legacy Option ROMs option needs to be turned off.
                            CAUTION: Using the Dell Command | PowerShell Provider, you cannot disable this feature. NOT
                            E: One of the methods of configuring this feature is from the BIOS setup screen.
#Turn on SecureBoot
Set-Item DellSmbios:\SecureBoot\SecureBoot -Value Enabled
Now it is safe to reboot!
Clear TPM
All above steps are necessary for OS to correctly communicate with Trusted Platform Module chip. If those steps do still did not do a thing just try to clear microcontroller. It can be easily done from Windows or in BIOS.
🔥🔥Before proceeding remember to backup your Bitlocker key to safe location🔥🔥
also I recommend suspending Bitlocker because it will allow to automatically save recovery key in TPM again after wiping chip.
#Run powershell as local admin
Suspend-BitLocker -MountPoint C #provide OS disk letter
Clear-Tpm
#And you are done
Work and school account
We’ve gone so far and if device did not join AzureAD at this point we need to give it one last kick-start! If on your device there are Office 365 family apps installed open one of them (it really should not matter but I prefer Word) and go to Account Settings and then click sign out.

If previous steps did their magic when you sign-in you should see window:
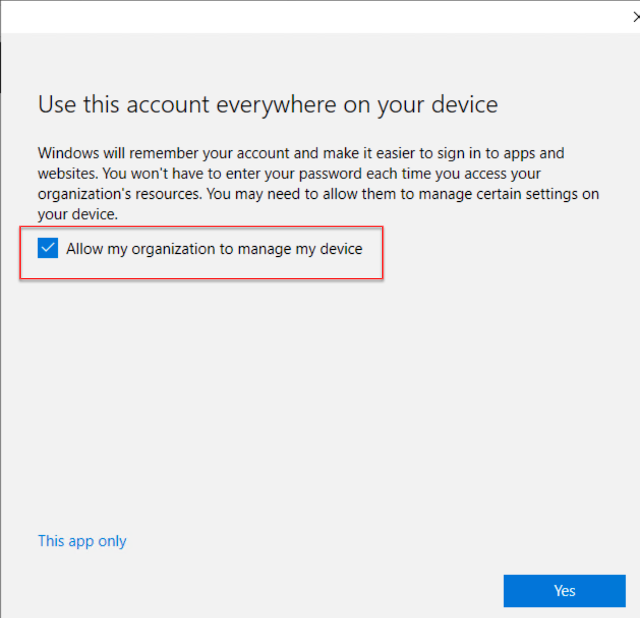
Click Yes and you device should now join AzureAD and after couple of minutes and reboot Intune too. If you bump into error message which says Your device is already managed by an organization and you are sure that there are no Work or School accounts added in settings your last resort might be to reinstall Windows 😫. It happened to me once and I found no other resolution…
Summary
In modern desktop management I think that it all comes down to health of device TPM and Windows ability to communicate with chip.
I hope that you will find those steps useful. Some cases might work after applying one of the remediation’s and others will need to be diagnosed and fixed thoroughly. Unless there are some hardware issues with device I think that all the issues can be fixed 😉
See you in next! 😉 🧠